Showing posts with label hobby. Show all posts

Saturday, December 10, 2011

Painting Setup

No Regrets!

I purchased my Iwata HP-CS in June for $150 and will never look back! It has given me the boon I needed to come back to the hobby scene and start painting again. It has a beautiful polished stainless steel body and is finely balanced. Cleaning is really easy as well. I have it hooked up to an 8ft braided nylon hose which is connected to a regulator with built in water trap. I used a quick connector on the hose so I can use the compressor for other air tools or brushes. Don't forget the Teflon Tape! The compressor is an oil-less garage style machine which makes alot of noise! I hope this year I can get some more painting commissions so I can replace this beast with an Iwata silent one!

The paint, thinner and primer I use for most of my projects is by Tamiya. The paint is $2.99 a bottle and contains 10mL. The paint sprays really well, and is easy to clean considering it is solvent based. I mix about 1:1 thinner to paint for the airbrush and run the PSI at around 7 to 10 psi.

Anyone who hasn't yet tried this match made in Japan should give it a go! I will be making a video soon showing the brush in action applying camo to a StuG III


... Mitch

Sunday, January 9, 2011

Cruiser Complete

The Avalon Cruiser is Complete and Ready to Deploy!

I finished up the Cruiser today, and it turned out really well I think. I used a mix of different grays for the hull. I used storm and icy from reaper and codex from GW. The was reapers carnage red mixed with GW blood red. I used the red to create a nice contrast from the dull hull.

To create shading I used nauseating blue from GW. Its one of my favorite colors in the GW range. Metallics were done with Tamiya gunmetal and GW boltgun metal. I am still unsure if I will put a wash on the metal surfaces.


I will be creating a stat sheet for this cruiser using Squadron Strike later this week. I'll compile a complete list when I finish up the other starships and make them available for download. Now all I need to do is name this warship! Any ideas?

... Mitch

Saturday, January 8, 2011

WIP: Avalon Cruiser

I am currently working on an Avalon Cruiser from the Battletech universe. The miniature is made by Iron Wind Metals and can be found here.  The choose to do the cruiser in a dark grey with red trim. As you can see, I just have some of the basecoat done. I plan on using a gunmetal for the engine parts and vents. For the base, I am just using 1/16 brass rod and a square base. More to come soon.

... Mitch

Friday, August 13, 2010

Winner Announced: 3 Gamesday VIP Tickets


The winner of the pair of tickets is Amber and Steven Hupalo from Oakville. They will be receiving a pair of tickets courtesy of Andrew(twinlinked) and the Ottawa Gamer!

The winner of the single ticket is Danny Curtis of Chapel Hill! He will receive a VIP ticket courtesy of Nick(Toxic Alien) and the Ottawa Gamer!

The tickets and being sent with Canada Post to be on the lookout for the letter!

Also, please ensure to take many pictures and email them so we may envy your enjoyment next weekend while you cut in front the the lines VIP style!

Oh, the picture below? That was taking at the Montreal Botanical Garden last weekend! I know it gives me ideas for making terrain, what about you?

... Mitch

Sunday, August 8, 2010

Pegasus Hobbies Crater Set

When I was in North Bay this weekend I picked up this Pegasus Hobbies Crater Set for only $24.00 for 5. I'm very happy with the quality and the fact that this set is cheaper then GW's and its painted.


...Fox

Tuesday, August 3, 2010

WIP: Hassle Free Imogen #1

I recently received this miniatures from the great folks at Hassle Free Miniatures. She didn't require much cleaning at all, and assembly was a snap. I did end up gluing my finger to the wings when I held them while they dried!
I have allot of experience painting up lava/heat effects on miniatures, so I look forward to painting up the flaming sword this weekend. The flesh will be painted using a base of Reaper Tanned Flesh, and I am thinking of painting the hair a nice auburn color, maybe with a streak running in it. For a base, I have a resin cracked earth, which should work really well!


... Mitch

Sunday, July 18, 2010

Tutorial: Lava Armor

Today I will be showing a small tutorial on how I painted the lava effects on my Razorback. This Razorback is designed for my Sternguard Squad.

Supplies Used
  • GW Blood Red
  • GW Sunburst Yellow
  • #0 Raphael Kolinsky Brush
  • ForgeWorld Razorback with lascannon
  • Resin upgrade kit. I got mine from Chapterhouse Studios
  • P3 Black Paint
  • Tamiya German Grey spray
  • Krylon Camo Black spray
  • Reaper flow improver
The first step is to assembling the tank and prime it. I used Krylon Black spray as the primer. I was able to get a nice base coat on the mode with German Grey, which I used for my other Salamander's tanks. The resin extra armor, doors and front armor plate are from Chapterhouse studios. There a great addition to my command tank, and I highly recommend them.


After everything is assembled, base coated and ready to go, the first thing that needs to be done is apply a nice yellow to the cracks. If your paint is thinned out, this step will be very easy. Try to cover all the cracks fully.


 Next you will make yourself a custom shade of orange paint. Take about 1:3 ratio of red to yellow and mix them together. This should make a nice shade of orange for this step. Take the orange and paint it into the cracks of the armor. Try to leave about a third of the yellow on the armor plates showing through.


After the orange paint dries, take your red paint and cover up some of the orange. A good spot for the red is around the edges of the plates. The reason for this, is the hottest lava will be yellow, and will turn orange, red and then black as it cools down.


 After the red dries, take the black paint, and paint the highest part of the armor plates. This will be where the lava has cooled the most, and well tidy up previous work. When this step is done, your done!  


 Congratulations! If you've followed these steps, you should have a lava like effect on your model in under fifteen minutes! If you want a set of army like this, please checkout Chapterhouse Studios.
... Mitch

Saturday, July 10, 2010

Wargaming on a budget

This is a topic that I always here at my FLGS and conversations with friends. It seems no matter on the price of figures or a game system, its always too expensive! Some people argue and fight on the price of the hobby. Something to consider is how much in junk food does one buy a month, or cigarettes, or fuel from driving around? More then wargaming I'm sure! Even so, saving money is always a good idea!  Since money doesn't grow on trees, atleast in Canada! So i decided to ask a few of my friends on how they budget there gaming needs and here are a few replies I got back.

Crablezworth:
  • Buy used if possible
  • Start slow, finish what you buy.
  • Don't buy anything new until the last purchase is painted, based and ready to play.
  • Well conceived count as models can save you a lot of money.
  • Converting if planned well can also save a lot of money.
  • Avoid metal models like the plague.
Darby:
  • Used packing foam from a laptop and put it in my GW case to help carry tanks.
  • Stripping models rather then buying them new
  • Making terrain out of barker board and foam board.
  • Felt from a fabric store for a table top mat (just don't wash it lol)
  • Using robot and barbie to make a titan.

Doug:
  • Use e-bay. Be careful to check postage costs and try to buy in your own country to avoid duty charges. Do research and find a price that you think the item is worth. Bid that worth and don't go any higher. Getting in a bidding war may result in you paying too high a price and regretting purchasing that item.
  • Use forums on the Internet, that people post for buy, sell and trade. Be very careful, if dealing outside your city, as opportunity too meet and trade in person may not be possible. If you do arrange a personal meet, meet in a public place, such as a mall.
  • Liquidation stores and 'dollar' stores are good places to find the tools and storage boxes, you may need. Clippers, files etc. are commonly, cheaper at discount stores.
  • Building your own terrain is cost effective. There are many articles on the Internet, on blogs and in forums, that explain how these items can be made cheaply.
  • Get the aid of friends can save money and time. Arrange painting parties, where you can get some of your models painted and help your friends do their models.

Andrew:
  • I just don't really have any ideas besides using forums to buy used models
  • Using the free tables at gaming stores
  • Building your own cover and buildings.

Mitch:
  • Purchase used models when you can
  • The dollar store has been a major sorce of random bits I've used to make terrain and models
  • Barter! When doing a trade, the listed price isn't always the lowest price. Sometimes you can even get things at cost from a store, or vendor if the product doesn' move fast.
  • Don't waste primer. Putting thick coats on a model not only obscures all the fancy details, but at $18 a can, it isn't cheap!
  • Buy your supplies at art stores. You can get beter quality brushes cheaper, and most of the tools and supplies you would need at half or lower the hobby price.
  • Be creative. It doesn't hurt anything to try something new!
  • Try other model manufactures. Some companies sell really nice figures that are from lesser known sculptors, at discounted prices!
  • Shipping from the UK is generally cheaper then from North America when you live in Canada

Greg:
  • Arts and crafts stores. Things that don't often seem to lend themselves to wargaming can be found if you use your imagination. An example being small beads shaped like a cylinder. With proper painting they look exactly like spent bullet casings. I bought a bag for $1, and probably have 1000 of the things for my bases.
  • Coloured spray paint. Spray paint is extremely cheap at larger stores like Walmart. You can use them to base coat troops, but they really shine when it comes to vehicles. Using a $6 Krylon brand spray paint, I base coated about 6 vehicles before the paint started to get low(tanks, Valkyrie, etc).
  • Wet palette. Making a wet palette will save you money in the long run, because your paint will dry much slower. Also, you will be able to work for a longer period of time without worrying about your paint drying on you.
  • If you need a model, a certain part, or just ideas, find a website that has local people. Most wargamers will help other wargamers. Generally we understand how expensive the hobby can get, and so most will do their best to be supportive.

  
So what do you think fellow Wargamers? What tips and tricks do you have for stretching that hard to save dollar?

... Mitch

Monday, June 21, 2010

DIY - How to Strip Your Models!

Hey folks, Fox here. Just a little video on how I go about stripping models. I cover metal, plastic, what you need, effects on glue and green stuff. Hope you enjoy!


What you need:
--------------------
-Degreaser
-Rubber Gloves
-Tooth Brushes
-Glass Bottles

WARNING: Be fricken careful! :)


Eldar Tactics
... FOX

Wednesday, September 23, 2009

World Wargamer Community has Ventrilo!

Hey guys, Fox here from Eldar Tactics. I found this thought this was a fantastic idea. Picture this your sitting around talking to friends about war gaming, painting, modeling and what not from the comfort of your home and your friends are all over the world! Cool huh. Thanks to Catattafish, if you have Ventrilo there is a world wide war gaming voice chat, don't have it no worries follow this Ventrilo Download link and join up. Server info is below.

toronto.maxfrag.net
3826

Saturday, September 12, 2009

Leichter Panzerspähwagen: SdKfz 222

I built this Airfix 1:76 Scale kit last week, and painted it up tonight. Its a demo used for an upcoming project and is from my personal collection. I used Tamiya panzer grey as the base coat, with a Mig tan filter and Mig Brown wash. For weathering, I used a sepia and ochre pigment powder from vallejo using acrylic medium. It turned out alright considering the tank is less then two inches long! I didn't do any fancy detail work since airfix kits really lack the detail you'd find on a Revell or PST kit. In the end it was an easy to assemble kit and I recommend it since the price was $6.00 Canadian.


From Wikipedia

The Leichter Panzerspähwagen (German: roughly "Light Armoured
Reconnaissance Vehicle") were a series of light four-wheel drive armoured cars
produced by Nazi Germany from 1935 to 1944.
They were developed by Eisenwerk Weserhütte of Bad Oeynhausen.
Chassis were built by Auto Union in Zwickau and assembled by F. Schichau
of Elbing and Maschinenfabrik Niedersachsen in Hanover-Linden.
It used the standard sPkw I Horch 801 (heavy car) chassis with an angled armoured body and turret. The rear mounted engine was a 67 kW (90 hp) Horch 3.5 petrol engine, giving it a road speed of 80 km/h (50 mph) and a cross-country speed
of 40 km/h. It had a maximum range of 300 km. Used by the reconnaissance battalions (Aufklärungs-Abteilung) of the Panzer divisions, the type performed well enough in countries with good road networks, like those in Western Europe. However, on the Eastern Front and North Africa, this class of vehicle was hampered by its relatively poor off-road performance. In those theaters, it gradually
found itself replaced in the reconnaissance role by the Sdkfz 250
half-track. The Sdkfz 250/9 was the Sdkfz 250 with the same turret as the
Sdfkz 222. The Sdkfz 222 was examined by Soviet designers before they
created the similar BA-64 light armoured car. Front and sides were made
of 8 mm (0 in) steel; thinner 5 mm (0 in) plates protected the top, rear,
and bottom. Cast vision ports later replaced ports cut into the armour. The
open topped turret was fitted with wire mesh anti-grenade screens. This version of the vehicle was armed with a 2 cm KwK 30 L/55 autocannon and a 7.92 mm MG34
machine gun.


As you can see, this would be a great vehicle to a commanders vehicle pool!
... Mitch

Saturday, August 22, 2009

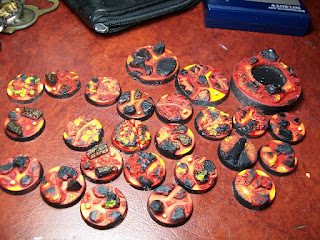
Lava Bases: A how-to and Product Review!

Lava Bases

Hi guys, today I will be showing what I have been working on! Lava Bases for my Salamanders Army! The resin bases I am using and reviewing today are from Dark Art Miniatures. Klaus sculpted these bases himself and it shows.

The detail work is great, and varied between the 10 piece 25mm bases. The lava/magma itself looks like floating rocks, suspended in a lava flow, very hot looking lava. The 40mm bases are very similar in design and look great as well. My Terminators will enjoy there new bases. Last but not least is the 60mm base. This sculpt is great, and has a mini volcano on it with bubbling lava pouring out!

In general, the bases are of good weight and will support models well. Pinning will be required, and very much needed on a few of the oddly shaped 25mm bases. In the end, I would rate these bases a solid 9.5/10 and a recommended purchase!

For those interested to get the painted look I achieved:

1) Sand, file and clean the bases. Prime Black

2) I layered the following colors in succession: Dark Maroon Red, Dark Red, Bright Red, Orange (made from Bright Red and Dark Yellow mixed), Yellow. I used dots of white on the very hottest spots.

3) I did a drybrush of Dark Grey, then a light drybrush of Medium Grey. I used a Light Grey and manually added edge highlights.

I did use all the paints show in the pictures below to achieve the look I got.


... Mitch

Monday, August 3, 2009

Game Summit Summer 2009!

The Biggest Canadian gaming event of Summer 2009
Game Summit is back for its third and biggest event ever, August 29th and 30th at the Nepean Sportsplex in Ottawa . Bringing more to the table than ever before for dice-throwers, role-players and war-gamers alike, Game Summit is the place for good times this summer. We welcome you back and eagerly look forward to showing you all the new games, activities and events that we offer to make this Game Summit the best yet.


Got board games? Game Summit does: From the classic to the contemporary, strategy board games of all kinds will be on the table and ready for action. The Casual Gaming Pavilion (sponsored by The Comic Book Shoppe) lays out a broad range of top quality games for family and friends to enjoy all day long, both days of the Summit. Not only can you enjoy popular and well-known titles like Settlers of Catan, Carcassonne, Stratego, Axis and Allies and a plethora of others, but Game Summit will be holding its first Chess and Go tournaments for lovers of traditional competition (and oh yes, there will be prizes). We keep it casual in the CGP, so come alone, bring a friend or bring your kids to sit down and play a game you love or learn about a game you've always wanted to try your hand at.

Got a taste for something a little more in-depth? Find your way to the Game Summit RPG Den where role playing and card games will be running constantly around the clock. Sponsored by Wizard's Tower, the role playing games will include legendary favorite Dungeons and Dragons as well as several other favorites with custom scenarios and Game Masters at the ready to take you into a realm of adventure. If you're a fan of the epic Magic the Gathering card game, you'll be in good company as MTG players will meet for all sorts of open and organized play, including tournaments. Lastly, the much-loved Steve Jackson Games will be represented with Munchkin and Muchkin Quest (along with several Munchkin expansions), where fantasy adventures have the hilarious SJ touch.

The Game Summit Arena has never made a bigger showing than ever: As per usual, you'll find premiere-level Warhammer Fantasy and 40,000 tournaments for the hardcore competitor, but you'll also find Warhammer 40,000 Apocalypse as well as tons of pickup games at your fingertips. This Summit also hosts its first Warmachine/Hordes tournament, bringing the heavy-hitting games of steampunk and beast mastery to our custom-made game tables. As if that's not enough, you'll find Battlefront's much-lauded Flames of War hitting the tables and bringing World War II-era battles to life. If you have a taste for bigger, epic battles then be sure to check out our War of the Ring megabattle that will bring the Alliance of the West to the Black Gates of Morder for a pitched war for the Ring of Sauron. Games will be going all day both Saturday and Sunday and there's room for everyone who wants to heed the call to arms.

Being a gamer can be about more than throwing dice, and that's why the Game Summit Workshop has more to offer than ever before. Come and meet our friendly painting tutors and try your hand at painting beautiful miniatures (courtesy of Reaper Mini) and get a few tips along the way to create a more beautiful model. Already got a little experience under your belt? Prove it by entering one of our two contests: A general painting contest (for best miniature or vehicle) on Saturday or a fast and furious speed-painting competition on Sunday to see just how much you can do when you're on the clock. More interested in modeling than painting? Check out our resin casting tutorials from Daily Hobbies which teach you how to turn resin into sculpted models you can paint and use on the game table.

Last, but definitely not least: The Game Summit Garage Sale invites you to bring your old games and hobby treasures (from board games to cards to models and miniatures) and put them up for sale. Grab a few dollars for some stuff that's been gathering dust in your closet or find a hard-to-locate treasure at one of our most popular events.


For a complete look at the scheduled events, visit the Game Summit website (http://www.gamesummit.ca/2009/08/sch-eng.php). Then, go ahead and pre-register and enjoy an early bird discount (http://www.gamesummit.ca/2009/08/reg-eng.php). You'll find everything you need on the Game Summit website but, if you still have questions or comments, drop a line to info@gamesummit.ca and let us know what's on your mind (originally written by Corey @ GameSummit.ca)

The Game Summit has always been a great time for gamers like me who enjoy all aspects of the hobby. I will be personally attending the 40k tournament, Warmachine, and the painting and modelling clinics! You will also see the one and only Alex Nemes partaking in a painting masterclass series, so make sure you get there to check the event out!

... Mitch

Wednesday, July 29, 2009

Introduction: African Land Shark

Well this is my first post with Ottawa Gamer, I was invited to join the ranks and with that, here is my current project:

This is a portion of my space marine army, however after much thinking and planning I've decided that I will be selling a small section of the army

Master of the Forge on Bike, heavily converted
8 Snipers including Telion
9(soon to be 10) Sternguard w 2 combi melta and 1 combi plasma
Drop Pod
5 Scout Bikers, sarge with power weapon

If theres anyone interested in purchasing it, along with further commission work, feel free to contact me

... LandShark


Alex is a great painter and these pictures don't do justice! He is a multi-winner of Golden Daemons and he taught me allot of things in painting, so I owe allot of my knowledge to him! So lets welcome the Landshark to the Ottawa Gamer! Expect some nice painting articles in the future!
... Mitch

Tuesday, July 28, 2009

Project Repaint: Salamanders #2

Here is a work in progress of the Rhino I am currently working on.

The green was intentionally faded using a MIG filter. The filter I am currently using is "brown for dark yellow". Its basically just a tan filter. A filter is somewhat the reverse of a wash, and reduces the contrast of a model. The rust effect is MIG's enamel based brown wash. It if applied to the corners and low points of the model, and it flows all around the cracks and details.

To get the green color, I painted the area knarloc green to give a nice foundation. I then mixed orkhide Green with snot green in a 50/50 mix and added in some reaper flow improver to get the final tone. Flow improver is a good product which I highly recommend if you want a smooth finish. The model isn't done yet, since I will be adding more weathering effects and more painted detail, so stay tuned for more updates.

Also, don't forget about the giveaway I am running which can be found here


... Mitch

Monday, July 27, 2009

Project Repaint: Salamanders #1

To be Unique or Not
Today I need some critique and comments on the following project I am doing. My goal is to refinish my vehicles for my Salamander Army. My old base color on the hull was chaos black, which was very difficult to add nice weathering, and looked very bland! So i have repainted all my tanks with "German Grey" which is a dark grey, similar to slate grey. The previous green color used on the armor plates and accents is more the 3rd edition seen in Index Astartes IV. Below are example pictures.

The first picture is the general paint scheme I am following for my marines, which is basically similar to dark angels green. This style of Dark Green is from Codex: Armageddon and Index Astartes, which were written during third edition. I make my color by painting knarloc green, and tinting it with Dark Green Ink. I use alot of metallics as well.

The Second pictures shows my current vehicles and there previous color scheme. The green is very close on how they used to look in person. The green is a similar tint as my marines.


For the third picture, this is a WIP shot of a rhino I am repainting. I am deciding if I want to keep the color "snot green" or go back to my older edition style green. (Keep in mind my 150+ marines, bikers and speeders are still painted the old green) I like my older edition scheme, but people mistake my army for dark angels allot. The side effect of going modern is my army will look like every other Salamanders in town since here is about 4+ other Salamander players using the "snot green" base. One is an old time Salamander player, Sallieman/Chris which is the original Salamander player in town.


So should I be unique in my army look, or being like everyone else! Please comment!
... Mitch

Thursday, July 16, 2009

Product Review, FREE giveaway and more!

Product Reviews, Free Prizes and Special Characters!
Hi, today's post will include a heavy amount of awesome for all you people who love Product Reviews, Free Giveaways and Special Characters! Yes, you read it right, there is prizes to be given out with this post! Keep reading to find out more!
Review - H.J. White Taklon Brushes

I received this set of synthetic nylon brushes in the mail today, which I got from miniwargaming.com/ . I am impressed with the shipping, since all the brushes were protected with bubble wrap, keeping them safe. It also only took a few days to arrive.
H.J. White Taklon is a white rayon taklon filament, man-made to perform like traditional Red Sable. Taklon has a good point, spring and a sharp edge, plus it is very affordably priced.

At first glace, there points are very sharp and the bristles are very firm, which is great for picking out details. Surprisingly, they are also priced really well for there quality. I estimate there durability to be mid level, sitting with sable-synthetic blend brushes.

Tonight, I used them to paint 2 Space marine characters, which will be featured after this review. The brushes performed good un-thinned with and thinned GamesWorkshop paint. It went on smooth, and cleaned off reasonably well with just a swish in water. When used with Leviathan purple wash, the #1 size brush didn't perform very well as it required multiple dips in the pot to complete the wash process.

I still prefer my Raphael Kolinsky brushes, but they are $35 each, so this alternative will be great on smaller projects!


Pros - Value, Easy to purchase, Best Synthetic Brush I've used
Cons - More suited for oil and acrylic based paints, Sable and Kolinsky are better choices for water based paints (GamesWorkshop, Reaper, etc)
All in all, I would give this brush set a solid 8.5 out of 10.

The Special Characters
What I have on display today is a White Consul Chapter master, with his escorting Liberian and captain. Any one of these characters will make minced meat out of some unlucky fool!

To the Prizes!

Today I have a sets of 6 brushes to be given away! Only used enough to make the above review! They are in perfect condition and waiting to be mailed to two lucky people!

This contest is available to anyone who is a follower of the Ottawa Gamer, and makes a comment on this post. After one week time, on midnight July 22nd, I will number the comments and use Random.Org to find the lucky winner. The winner name will be posted, and asked to send an email with there information to get the goodies out. Retail Value of the prize is $40.

In short, post here, follow the blog, and let the good times roll!

Thursday, July 9, 2009

Upcoming Summer Events!

Stay tuned to the Ottawa Gamer since there will be fantastic contests, draws and give aways before the summers end! Expect anywhere from $150 to $300 in fun! Expect the first one within the next month!


This is the view off my balcony where you can see my herb garnden growing!
Yes, this is really a random picture, but its my relax zone on weekends!
... Mitch

Monday, June 29, 2009

Project Rebuild: #1

Project Rebuild: #1

Since my Salamander Space marines were my first painted army, allot of laziness was done to complete this army. I've used primed black instead of painting black, used green ink to tint my army, missed flash lines and drybrushed allot of figures. My bases are also just red-oxide colored sand from Woodland Scenics ballast. I will be using various art supplies from pumice to acrylic mediums to create much better bases. I will be stripping and repainting allot of the figures and models I have done in the last 3 years.

The first models to take the dip in super clean were two rhinos I actually got used from a guy I knew in Renfrew, Al. Unfortunately they were primed very heavy and had very thick blue Ultramarine painting. It stripped alright, and I have filled the gaps with green stuff and rebuilt allot of the structure. I added plasticard unditching beams to the roof, brass rod antenna, reinforced the stormbolter with brass rod and added small touches with purity seals, and some FW bits. The first one looks a Little rough, but should shape up to be a nice vehicle when done.

... Mitch